Windows 11 can look good, but let’s be honest: out of the box, it still feels very limited when it comes to real customization. You can change your wallpaper, move a few icons around, maybe adjust some colors, and that’s basically it.
So for this setup, I wanted to try something different.
The goal was simple:
Can AI help redesign Windows into a clean, modern, futuristic desktop setup that actually looks better than the default Windows UI?
For this experiment, I used Codex, OpenAI’s coding agent. The interesting part about Codex is that it can work directly with files on your PC. That makes it especially useful for Windows customization, because most serious customization tools rely on config files, JSON, CSS, scripts, and custom code.
In this post, I’ll go through the full setup: wallpaper, taskbar, Start Menu, notifications, top bar, and Rainmeter widgets.
You can also download the full resource pack linked below and recreate the setup on your own system.
Downloads
Full Setup Pack:
📥 Download ResourcesThe resource pack includes:
- AI wallpaper
- Windhawk taskbar config
- Windhawk Start Menu config
- Windhawk notification config
- YASB top bar files
- Rainmeter widget pack
- Setup files and resources
Tools Used
For this setup, I used a few different tools:
- Codex – for generating and editing configs/code
- Photoshop / Nano Banana 2.0 – for AI wallpaper generation
- Windhawk – for customizing Windows UI elements
- YASB – for creating the custom top bar
- Nerd Fonts – for icons inside the top bar
- Rainmeter – for custom desktop widgets
1. Creating the AI Wallpaper
The first step was creating a wallpaper that would define the visual direction of the whole setup.
I wanted something with a futuristic glass aesthetic, smooth gradients, and a premium abstract look. The first attempt with Codex was not terrible, but it also was not really what I had in mind. It looked more like an old generic wallpaper than a clean modern desktop background.
The bigger issue was that the result did not really look like proper 4K. For a desktop setup, that is a problem because a slightly blurry wallpaper makes the entire setup feel lower quality.
So for the wallpaper, I switched to a more specialized AI image tool and used Photoshop with Nano Banana 2.0 to generate a sharper 4K image.
The final wallpaper uses a cold-to-warm gradient style with deep blue, cyan, white, orange, coral, and soft red tones. It has a smooth abstract wave structure that fits the glass UI direction of the rest of the setup.
To apply it:
- Download the wallpaper from the resource pack.
- Right-click the image.
- Select Set as desktop background.
2. Customizing the Taskbar with Windhawk
After the wallpaper, the next step was changing the actual Windows UI.
For that, I used Windhawk, a third-party tool that lets you modify parts of Windows that Microsoft does not normally allow you to customize properly.
You can download Windhawk from the official website linked in the resources.
After installing Windhawk, I installed the Taskbar Styler mod.
The goal for the taskbar was to create a clean floating dock with three separate sections:
- widgets area
- main app dock
- system tray area
I wanted it to look like separate frosted-glass islands instead of one long default Windows taskbar.
The first attempt from Codex did not really work. The second attempt was somehow even worse, but at least it created two separate islands, so technically there was some progress.
After a lot of prompting, visual references, and corrections, the taskbar finally got close to the look I wanted. The final version has a floating glass-like design with separate sections, transparency, rounded corners, and a clean premium layout.
To install the taskbar style:
- Open the resource folder.
- Open the taskbar TXT file.
- Copy all the code.
- Open Windhawk.
- Go to the Taskbar Styler mod settings.
- Open the advanced/textual mode.
- Paste the code.
- Save the settings.
After that, the custom taskbar style should be applied.
3. Redesigning the Start Menu
The next part was the Start Menu.
The goal here was not to use the new Windows category layout. Instead, I wanted to keep the classic Windows 11 Start Menu structure, but make it look much cleaner and more premium.
The design direction was:
- frosted-glass panel
- rounded corners
- clean pinned apps
- reduced visual clutter
- subtle transparency
- minimal premium layout
To do this, I installed the Start Menu Styler mod in Windhawk.
The first version Codex created looked almost like the default Start Menu, just worse and somehow in a weird light mode version. The next version was not much better either.
So I gave Codex more context, including existing custom code and a clearer explanation of how the Start Menu should be structured.
That helped a lot.
After a few more iterations, the Start Menu finally started to look like a real part of the setup. The final version has a clean glass design, a better layout, and a much more modern look than the default Windows menu.
To install the Start Menu style:
- Open the Start Menu TXT file from the resource folder.
- Copy the code.
- Open Windhawk.
- Go to the Start Menu Styler mod settings.
- Paste the code into the advanced settings.
- Save the settings.
4. Styling the Notification Menu
The last missing piece of the main Windows UI was the notification menu.
Again, I used Windhawk for this. There is a separate notification styler mod available, so I installed that and started working on the design with Codex.
This time, I gave Codex a clearer visual direction and reference code right away, because the previous attempts showed that it can easily generate broken or completely wrong code if you do not guide it properly.
The first version was actually not too bad. It mostly had padding issues, so I expected it to be a quick fix.
Of course, that was too optimistic.
Codex somehow generated invalid commands for the fix, so it took another iteration before the notification menu finally worked correctly.
The final result looks really good. It matches the glass look of the taskbar and Start Menu, with transparency, rounded corners, and a clean color style.
To install the notification style:
- Open the notification TXT file in the resource folder.
- Copy the code.
- Open the notification styler mod in Windhawk.
- Paste the code into the advanced settings.
- Save the settings.
At this point, the core Windows UI already looks surprisingly premium. The wallpaper, taskbar, Start Menu, and notifications all follow the same glassy AI-designed style.
5. Creating a Custom Top Bar with YASB
Next, I wanted to add a proper top bar to Windows.
For this, I used YASB, a customizable Windows status bar. It lets you display system stats, shortcuts, weather, battery, network speed, and other useful information at the top of your desktop.
You can download YASB from its GitHub page.
To install it:
- Open the YASB GitHub page.
- Go to the Releases section.
- Download the latest Windows release.
- Run the EXE file.
- Follow the installation process.
YASB also requires Nerd Fonts, because many of the icons used in the top bar depend on them. Without Nerd Fonts, half the top bar would look like some alien text combination nobody is supposed to understand.
To install Nerd Fonts:
- Go to the Nerd Fonts GitHub page.
- Open the Installation section.
- Download JetBrains Mono.
- Extract the ZIP folder.
- Select all font files.
- Right-click one of them.
- Click Show more options.
- Press Install.
After installing YASB and Nerd Fonts, I let Codex work on the top bar.
The goal was to create a useful system control bar with:
- upload and download speed
- battery widget
- system information
- weather
- calendar popup
- ChatGPT shortcut
- quick shortcuts
- clean shutdown menu
Surprisingly, Codex did a much better job here than with some of the earlier parts. It even started checking screenshots to see how the design looked on the desktop, which was honestly kind of crazy, but it worked.
The final top bar includes system stats, weather, calendar, shortcuts, and a clean power menu. It fits the overall setup really well and makes the desktop feel much more like a custom operating system.
To install the YASB top bar:
- Open the YASB folder inside the resource pack.
- Copy both config files.
- Right-click the YASB icon in the system tray.
- Click Open Config.
- Paste the new files into the config folder.
- Replace the old files.
- Restart or reload YASB.
After that, the custom top bar should appear.
6. Building Custom Rainmeter Widgets
The final part of the setup was creating custom Rainmeter widgets.
I wanted to test if Codex could build useful desktop widgets that match the rest of the setup.
The widgets I created were:
- clock widget
- weather widget
- media player widget
- YouTube channel stats widget
Clock Widget
The clock widget should have been the easiest test.
It only needs to display time and date information with a nice layout and typography.
And somehow, Codex still managed to mess up the first attempt.
The first version was not really usable, so I gave it another chance. After a few more iterations, it started to look better, but at one point it displayed the time and date twice, which was obviously not ideal.
After giving Codex clearer visual instructions, the final clock widget finally came together.
The finished design uses bold typography, blue accents, and a unique layout that fits the wallpaper and the rest of the UI.
Weather Widget
The weather widget was more difficult because it needed real data from an API.
Unlike a clock widget, weather requires actual temperature values, conditions, icons, location settings, and preferably a forecast.
This time, Codex actually did a surprisingly good job.
Apart from some small padding issues, the first working version already looked quite good. The widget can show weather information and also allows you to change your location through settings or coordinates.
After a few layout fixes, the weather widget became one of the cleanest widgets in the setup.
Media Player and YouTube Channel Widget
For the last widgets, I wanted to create a media player and a YouTube channel stats widget.
The media widget shows the current playing media and includes a visualizer, while the YouTube widget shows channel statistics.
At first, the YouTube widget had some issues. When I tested it with my own channel, it somehow showed 500 million subscribers, which would have been nice, but unfortunately was not exactly accurate.
After a short rework, the widget started working correctly.
The final result includes a sleek media widget and a useful YouTube stats widget that fits the glassy AI setup surprisingly well.
7. Installing the Rainmeter Widgets
To install the widgets:
- Download Rainmeter from the official website.
- Install it normally.
- Open the Rainmeter widget file from the resource pack.
- Run the
.rmskinfile. - Follow the installation process.
- Make sure to enable the option for the glass widget background if shown during installation.
After that, the widgets should appear on your desktop.
You can move them around and arrange them however you like.
Final Result
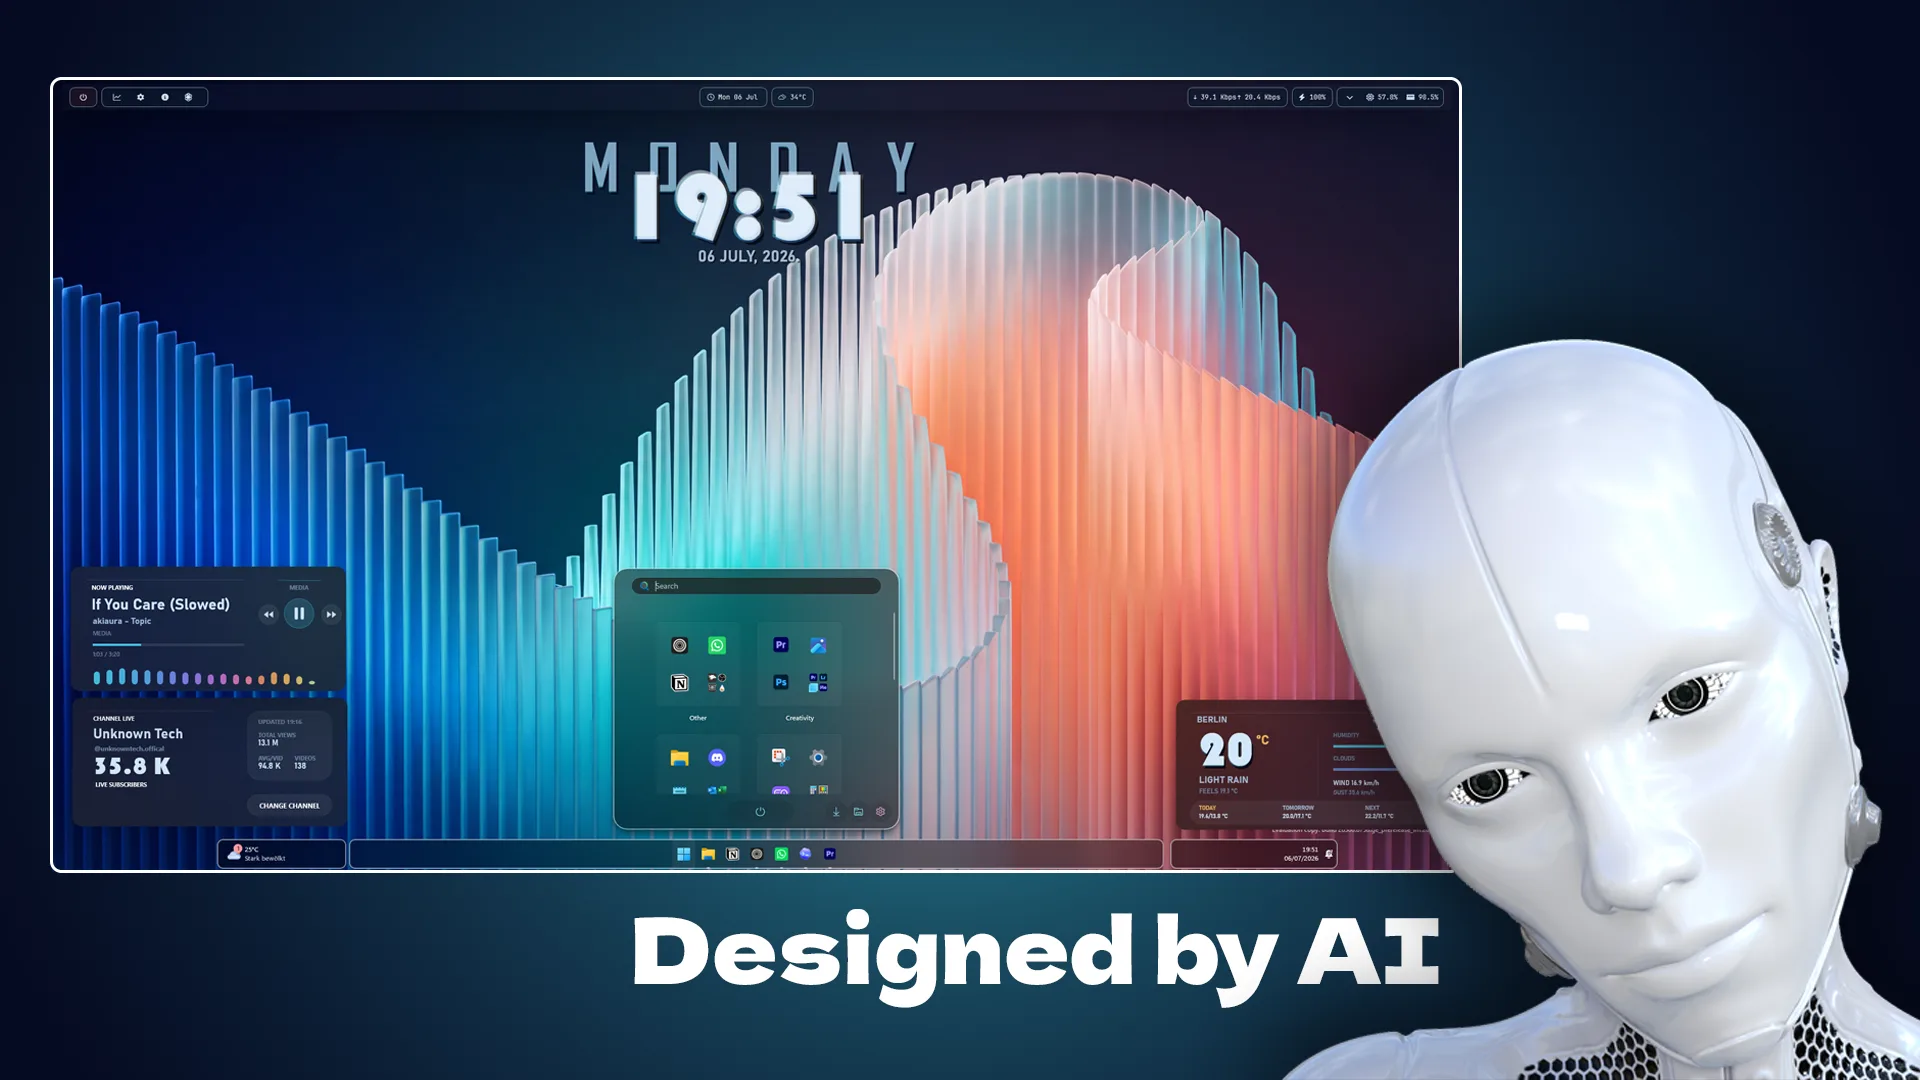
After all of this, the Windows setup looks completely different.
The final design includes:
- AI-generated abstract wallpaper
- glass-style taskbar
- custom Start Menu
- redesigned notification menu
- custom YASB top bar
- system stats
- weather and calendar popup
- ChatGPT shortcut
- Rainmeter clock widget
- Rainmeter weather widget
- media player widget
- YouTube channel stats widget
Overall, I think Codex did a surprisingly good job.
It definitely needed a lot of help. Some parts took many prompts, some code was broken, and a few results were completely wrong at first. But once it had enough context, examples, screenshots, and clearer instructions, it actually became useful for building a complete Windows customization setup.
The final result has a clean glass aesthetic, a strong color scheme, and a surprisingly premium feel.
So the real question is:
Did Codex create a genuinely good AI-designed Windows setup, or did it just generate some very polished AI slop?
I’ll let you decide.
Final Thoughts
This experiment showed that AI can be genuinely useful for Windows customization, especially when working with tools that rely on code and config files.
But it also showed that AI is not magic.
You still need to guide it, test the results, fix mistakes, and give it clear visual references. If you just ask it to “make Windows futuristic,” you will probably end up with broken configs and a desktop that looks like a concept image nobody would actually use.
But with the right tools and enough direction, AI can help create a Windows setup that looks far more custom, modern, and personal than anything Microsoft gives you by default.