The default Windows Terminal gets the job done, but let’s be honest—it isn’t exactly exciting to look at.
Meanwhile, all over the internet you’ll find people with beautiful terminal setups featuring colorful prompt segments, custom icons, transparent backgrounds, system information displays, and terminals that look like they belong in a hacker movie.
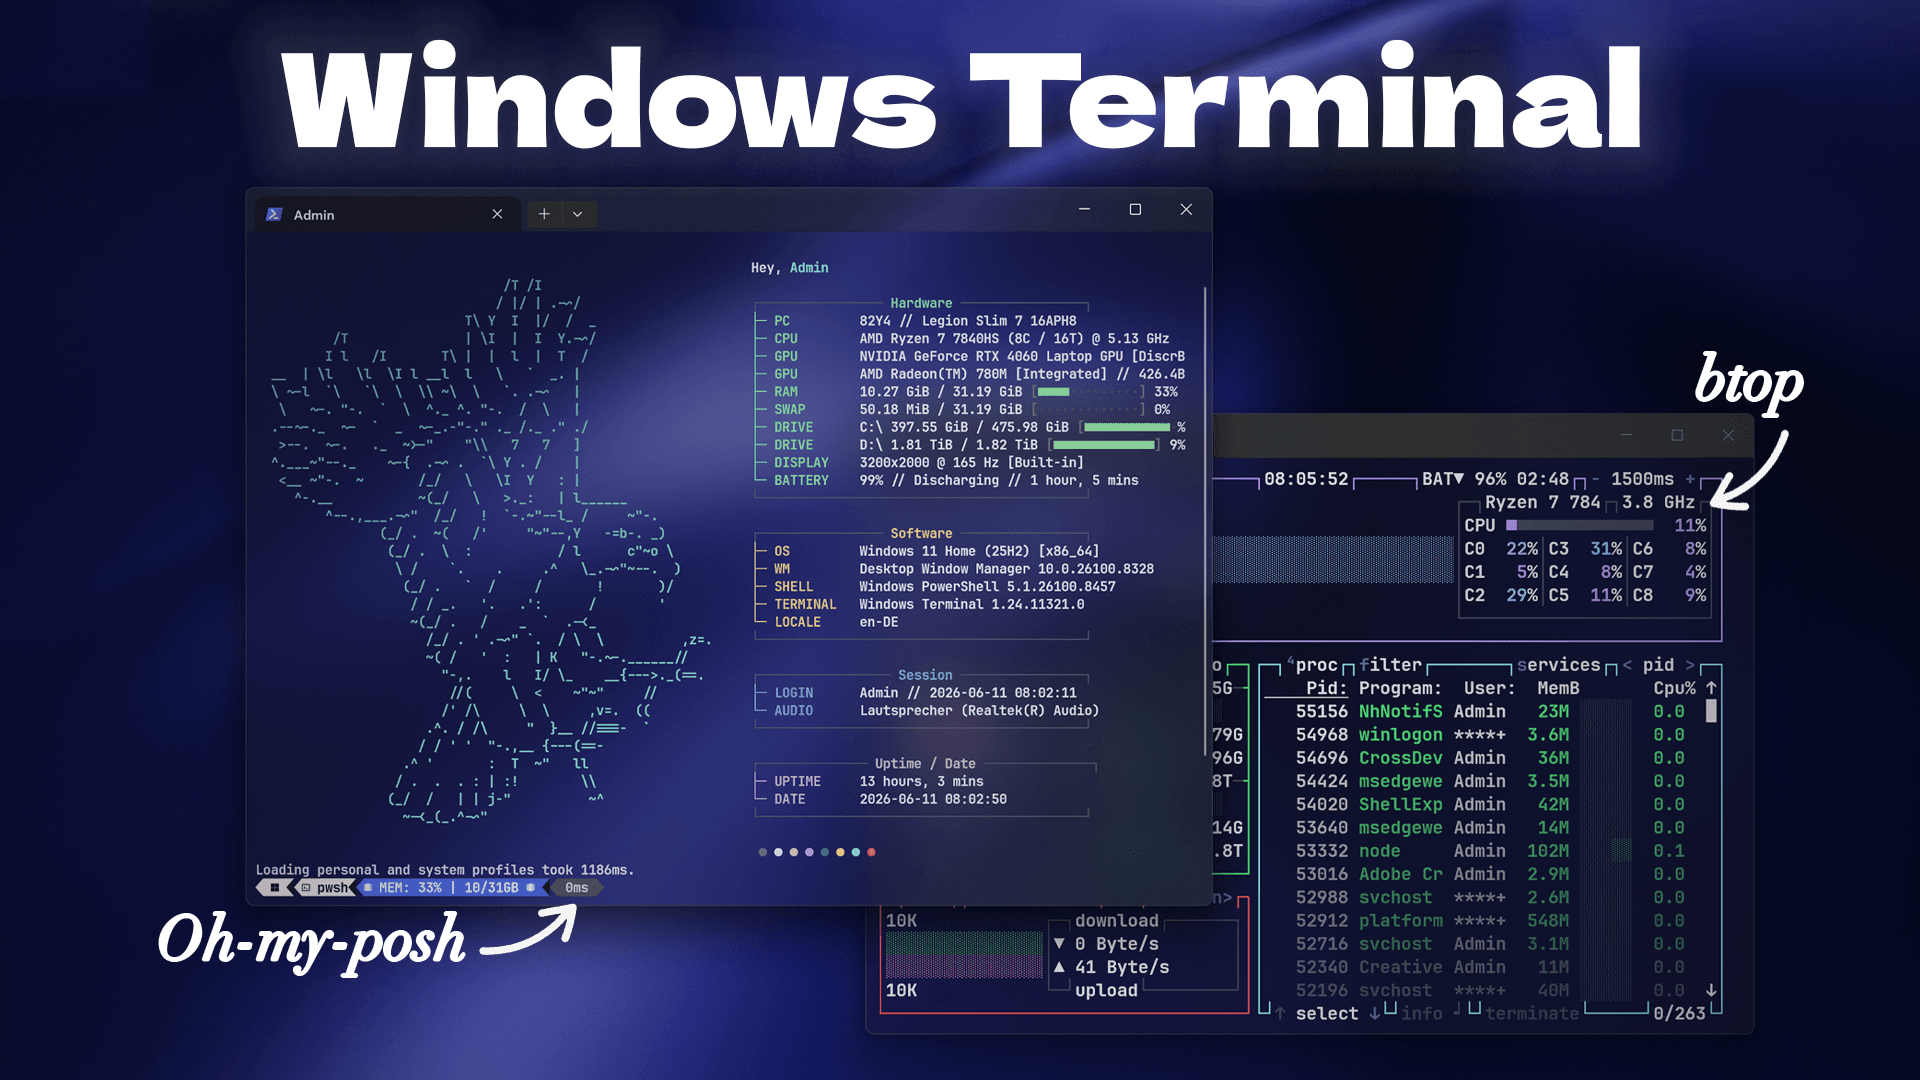
For the longest time I had no idea how people were creating these setups. So in this guide, we’re going to transform a completely default Windows Terminal into a clean and modern workspace using FastFetch, Oh My Posh, Nerd Fonts, transparency effects, and even a real-time system monitor.
What We’ll Build
By the end of this setup you’ll have:
- A modern PowerShell prompt with Oh My Posh
- Custom themes and prompt segments
- Nerd Font icons and symbols
- FastFetch startup information
- A transparent terminal design
- btop system monitoring
- A terminal that actually looks good
Step 1: Installing Oh My Posh
The first tool we need is Oh My Posh.
This is responsible for the colorful prompt segments, icons, Git information, status indicators, and all the visual elements that make modern terminals look so good.
The installation process is straightforward. Simply run the official installation command inside PowerShell and let it complete.
After the installation finishes, nothing will appear different yet. That’s completely normal because we still need to configure a theme.
Step 2: Installing Nerd Fonts
Before we can use most Oh My Posh themes, we need a compatible font.
This is where Nerd Fonts come in.
Nerd Fonts are modified programming fonts that include thousands of additional icons, symbols, and glyphs from popular icon packs. These extra symbols are what allow terminal themes to display logos, arrows, status indicators, operating system icons, and much more.
Download and install the required Nerd Font, then select it as your terminal font inside Windows Terminal settings.
Once the font is active, your terminal is ready for custom themes.
Step 3: Applying a Custom Oh My Posh Theme
Now comes the fun part.
Choose your preferred theme and open its profile file. The profile contains all the commands required to automatically load the theme whenever PowerShell starts.
Copy the profile code and paste it into your PowerShell profile by opening:
notepad $PROFILE
You’ll also need to update the path inside the configuration so PowerShell knows where your theme files are stored.
After saving the profile, open a new PowerShell window and your custom terminal theme should load automatically.
Step 4: Adding FastFetch
One of the coolest terminal tools available today is FastFetch.
FastFetch displays detailed information about your system including:
- Operating System
- CPU
- GPU
- RAM
- Storage
- Network Information
- Uptime
- Custom Logos
With the right configuration, FastFetch can create stunning startup screens that instantly give your terminal a premium look.
Unlike many terminal tools, FastFetch works across multiple terminal environments and is incredibly fast.
Step 5: Installing btop
To take things even further, we can install btop.
btop is a powerful terminal-based system monitor that gives you real-time information about:
- CPU usage
- Memory usage
- Disk activity
- Network traffic
- Running processes
Instead of opening Task Manager every time you want to check your system resources, you can simply launch btop directly inside your terminal.
Combined with FastFetch and Oh My Posh, it creates an incredibly useful workflow.
Step 6: Creating a Transparent Terminal
One of the biggest visual upgrades comes from enabling transparency.
Using Windows Terminal’s built-in settings, you can add transparency effects that allow your desktop background to subtly show through the terminal window.
Combined with a dark theme and modern prompt styling, this creates a setup that looks significantly cleaner than the default Windows experience.
Final Result
After combining:
- Oh My Posh
- Nerd Fonts
- FastFetch
- btop
- Custom Themes
- Transparency Effects
you end up with a terminal that feels completely different from the default Windows Terminal.
Not only does it look significantly more modern, but it also becomes much more useful for development, system monitoring, and everyday command line work.
If you’ve never customized your terminal before, this is one of the easiest and most rewarding upgrades you can make to your Windows setup.
Download the files, follow the guide, and enjoy your new terminal.
📦 Download Center
📥 Download fastfetch configs!- Nerd Font
- Terminal Themes
- Oh my posh
- fastfetch
- btop
- winget install –id aristocratos.btop4win -e
Follow us on YouTube (@Unknown Tech) for video tutorials, tips, and full walkthroughs for every step.
Have questions or want the code/snippets used in this video? Join our Discord!