If you’ve ever wanted to completely transform your Windows desktop into something unique, this setup takes things to another level. Instead of small tweaks, this is a full system overhaul—from wallpaper and widgets to the taskbar, file explorer, and even the cursor—all redesigned in a cohesive pixel art style.
This guide walks you through every step so you can recreate the entire setup yourself.
🎨 1. Setting the Foundation — Pixel Art Wallpaper
The entire setup starts with the wallpaper.
A calm Japanese pixel art landscape sets the tone for everything that follows. This isn’t just a background—it defines the color palette, mood, and overall aesthetic of your desktop.
Why it matters
- Establishes a retro pixel theme
- Creates a minimal, cohesive base
- Makes every other customization feel intentional
How to apply
- Download the wallpaper (link in description/website)
- Choose your screen resolution
- Right-click → Save image
- Right-click the file → Set as desktop background
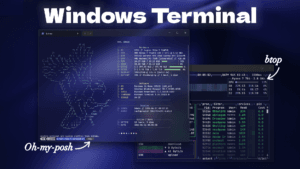
📊 2. Adding a Smart Top Bar with YASB
Next, you install the YASB (Yet Another Status Bar)—a powerful and highly customizable top bar.
What it adds
- System stats (CPU, RAM, network)
- Media controls
- Workspace indicators
- Clean top-bar layout
Why it’s essential
It acts as your information hub, giving you quick access to important data while fitting perfectly into the pixel theme with custom styling.
Setup overview
- Install required custom fonts first
- Download YASB from GitHub
- Install via the
.msifile - Open config folder via system tray
- Replace default config files with custom:
.yaml.css
Once applied, you’ll have a sleek, pixel-styled top bar.
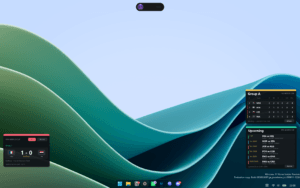
🧩 3. Desktop Widgets with Rainmeter
To bring your desktop to life, you’ll use Rainmeter—the go-to tool for Windows widgets.
⏰ Pixel Clock Widget
A clean pixel-style clock that fits perfectly into the theme.
Steps:
- Download from DeviantArt
- Install via
.rmskin - Position on desktop
🌦️ Weather Widget (with Fix)
This widget requires a manual API fix.
Steps:
- Install the widget
- Open config file
- Replace broken API key with a working one
- Add your location using coordinates from Google Maps
- Change font to “Bit Dust One” for pixel styling
🎵 Pixel Visualizer
Adds a music visualizer with a pixel aesthetic.
- Install via
.rmskin - Auto-load or enable through Rainmeter panel
- Position above taskbar
🐱 Side Cat Widget Pack
A full widget suite including:
- Resource monitor
- Wi-Fi info
- Profile display
- Shortcuts
Customization step
- Open styles file
- Replace default font with Bit Dust One
Why widgets matter
- Add functionality + personality
- Enhance the pixel aesthetic
- Turn your desktop into an interactive workspace
🛠️ 4. Full UI Overhaul with Windhawk
Now comes the most powerful part—modifying the actual Windows UI using Windhawk.
This step transforms:
- Taskbar
- Start menu
- Notifications
- File explorer
- Icons
Key Mods Used
1. Taskbar Styler
- Applies pixel-style design to taskbar
- Requires custom code (from your files)
2. Taskbar Clock Customization
- Changes font and layout of time/date
- Matches pixel aesthetic
3. Start Menu Styler
- Minimal, clean pixel-style start menu
4. Notification Styler
- Redesigned notification panel
- Matches overall UI theme
5. File Explorer Styler
- Applies blocky, pixel-inspired UI
- Completely changes browsing experience
6. Resource Redirect (Icons)
- Replaces default icons with pixel versions
- Final touch for consistency
Why this step is critical
This is what turns your setup from “customized” to fully transformed.
Without it, the system still feels like Windows.
With it, everything becomes part of one unified design.
🖱️ 5. Pixel Cursor
Finally, you customize the cursor to match the theme.
What it adds
- Pixel-style pointer
- Custom animations (loading, etc.)
Setup steps
- Download cursor pack from DeviantArt
- Extract files
- Run
install.inf - Open Windows mouse settings
- Apply new cursor scheme
Why it matters
The cursor is something you see constantly—so matching it completes the experience.
🖥️ Final Result
After completing all steps, you’ll have:
- A fully themed pixel art desktop
- Custom top bar + widgets
- Redesigned Windows UI
- Matching icons + cursor
This isn’t just customization—it’s a complete system redesign that feels cohesive, minimal, and functional.
For help with mods or to discuss setups with other customizers, join our Discord community. Support the project by liking and subscribing to the channel for more setup guides.
📦 Download Center
📥 Download Custom Codes!- Wallpaper
- YASB Font
- YASB
- Rainmeter
- Pixel HUD Skin
- Small clean weather widget
- API Key: e1f10a1e78da46f5b10a1e78da96f525
- Pixel Visualizer
- Side Cat Widgets
- Windhawk
- Pixel Lua Light Cursor
Follow us on YouTube (@Unknown Tech) for video tutorials, tips, and full walkthroughs for every step.
Have questions or want the code/snippets used in this video? Join our Discord or check out the Downloads section below!
📺 Want to see it in action? Watch the full video on YouTube.
Don´t want to miss out on new customization tools and setups?
Subscribe to our newsletter and stay ahead in the world of Windows customization! From the latest tools to our favorite setup ideas, you’ll never miss a chance to enhance your desktop experience again!
Disclaimer for Source Code / Tutorials
The code examples and tutorials are provided for educational purposes only. Use at your own risk. I do not accept any liability for damages resulting from the use of this code.