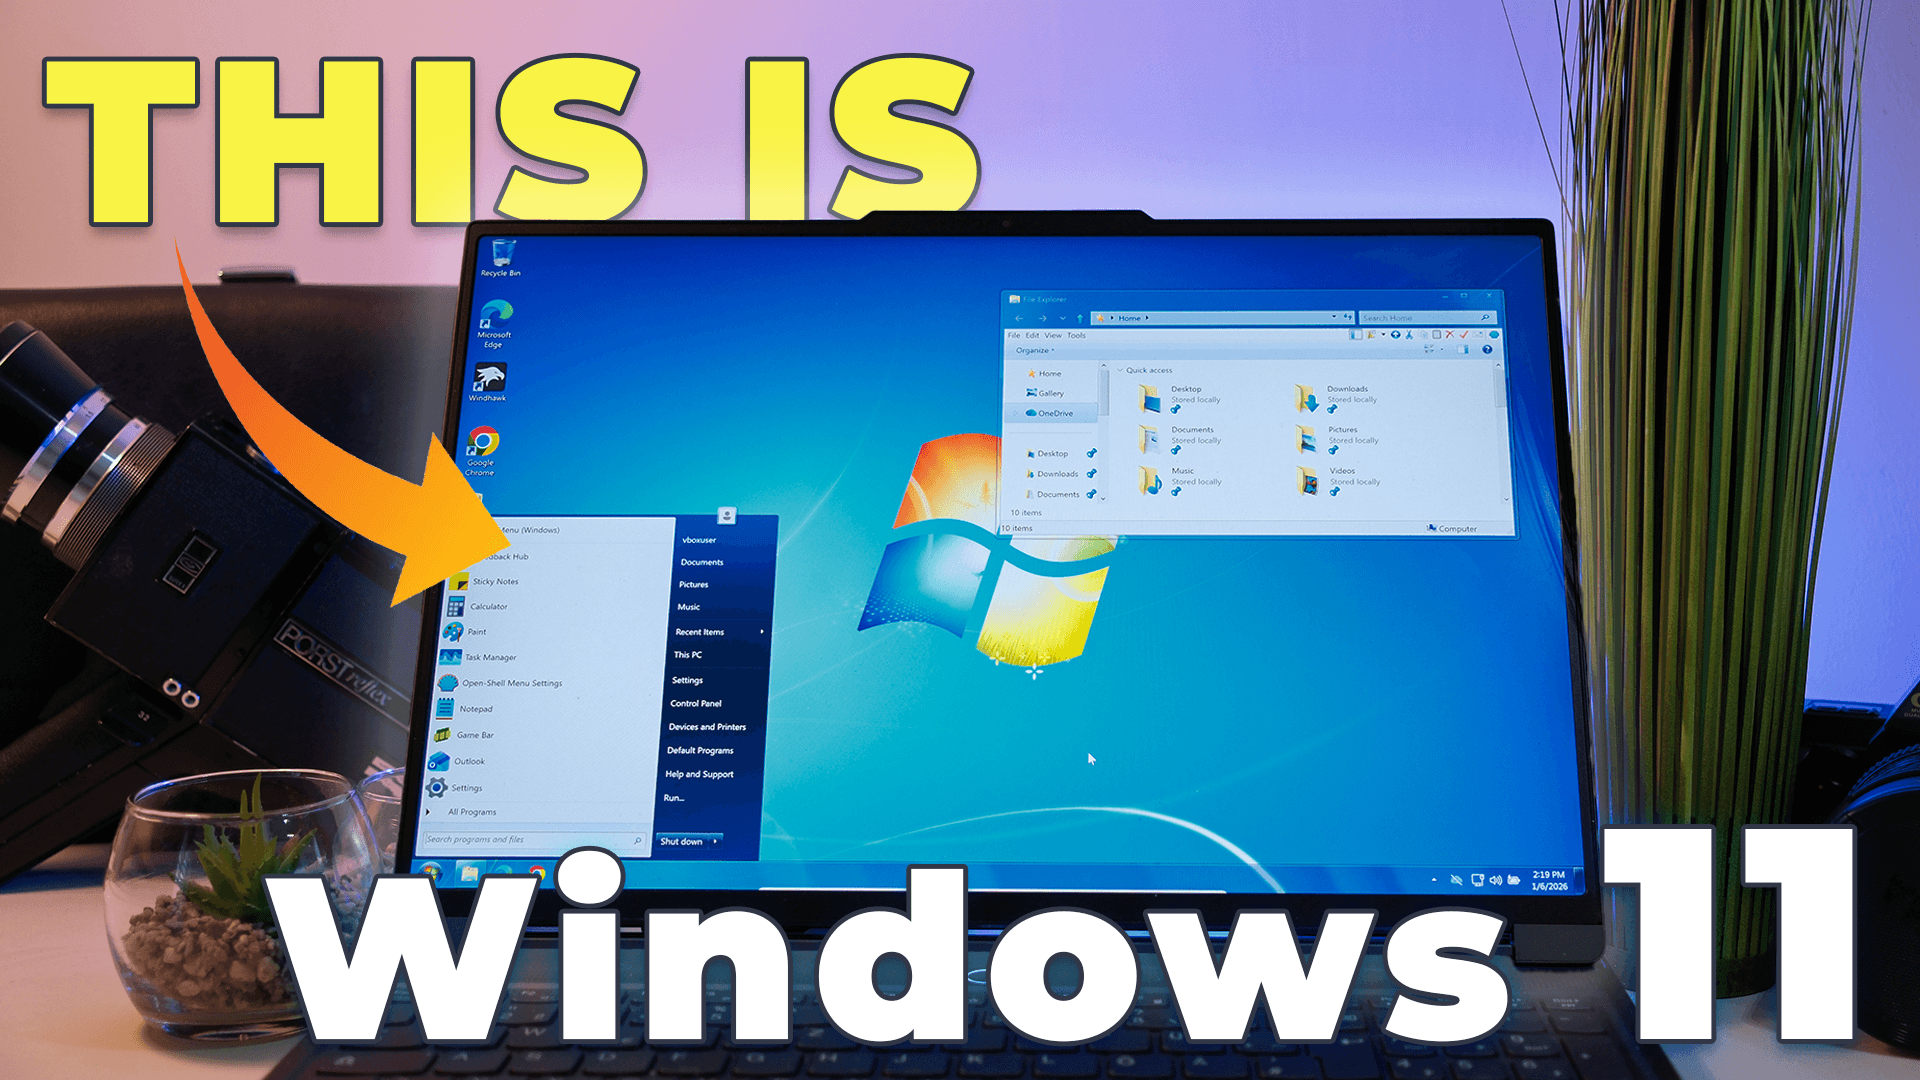
Can Windows 11 — one of the most controversial Windows releases — be transformed into Windows 7, arguably the last version of Windows that achieved near-universal approval?
The answer is yes.
This project documents a full Windows 11 to Windows 7 transformation using a small set of well‑established tools. The result recreates the iconic Aero Glass look, complete with classic window control buttons, the original taskbar and Start menu, legacy 3D‑style icons, and a Windows 7‑like File Explorer — all while running on a modern Windows 11 system.
Most importantly, this setup:
- Does not modify core system files
- Remains stable and update‑friendly
- Has no major performance impact
This guide explains each tool used, why it is necessary, and how it contributes to the final result.
Chapter 1 — Windhawk
What It Does
Windhawk is the foundation of this entire transformation. It is a runtime customization platform that allows Windows behavior and UI elements to be modified through modular extensions, without patching or replacing system files.
In this setup, Windhawk is responsible for:
- Recreating the Windows 7 taskbar, including layout and styling
- Applying a Windows 7‑style theme for window buttons and wallpaper
- Enabling classic 3D icons
- Restoring legacy window borders
Without Windhawk, most of the Windows 7 experience simply cannot be reproduced on Windows 11.
Why It Is Needed
The Windows 11 taskbar and window styling differ fundamentally from Windows 7. The modern UI introduces centered icons, oversized elements, flat visuals, and removed legacy behaviors.
Windhawk allows these limitations to be bypassed safely. Because its mods are reversible and maintained through GitHub, it provides deep control while preserving system stability.
How to Set It Up
Start by downloading Windhawk from windhawk.net and installing it. The installation is straightforward; it is recommended to store the application in a dedicated custom folder for better organization.
Once launched, Windhawk presents a library of hundreds of mods. For this transformation, the following are used:
Windows 11 Taskbar Styler
Install the Taskbar Styler mod and ignore the warning prompt — Windhawk mods are reviewed on GitHub and safe to use.
In the mod settings:
- Select Windows 7 style from the dropdown
- Save the configuration
At this stage, the taskbar will resemble Windows 7 structurally, but Windows 11 elements will still be present.
To fix that, right‑click the taskbar and open Taskbar settings:
- Hide the search box
- Disable Task View
- Disable Widgets
- Set taskbar alignment to Left under Taskbar behavior
This completes the base taskbar layout.
Notification Styler
Windows 11 notifications cannot be fully reverted to Windows 7 behavior. As a workaround, install Notification Styler via Windhawk and set the style to Translucent to better match the Aero aesthetic.
UX Theme Patcher and Aero 7‑11 Theme
To restore classic window buttons and wallpaper styling:
- Install UX Theme Patcher from Windhawk
- Download the Aero 7‑11 theme package from GitHub (linked in the video description and on unknown-technology.com)
- Extract the archive and copy the theme files
- Paste them into:
Windows > Resources > Themes
Then:
- Right‑click the desktop
- Open Personalization > Themes
- Enable Aero 7‑11 Round
This applies the Windows 7 wallpaper and classic minimize, maximize, and close buttons. Glass transparency will be added later.
Bring Back the Borders
To restore classic window borders:
- Install Bring Back the Borders in Windhawk
- Open Windhawk settings
- Expand Advanced settings
- Add
dwm.exeto the process inclusion list - Save changes and restart the system if required
This reintroduces the familiar bordered window look from Windows 7.
Resource Redirect
Finally, install Resource Redirect, which enables system‑wide icon replacement. This allows the use of classic Windows 7‑style icons across the OS.
Chapter 2 — Open‑Shell (Start Menu)
What It Does
Even with a classic taskbar, the transformation is incomplete without the original Start menu. Open‑Shell restores the Windows 7 Start menu layout, including categories, search placement, and transparency behavior.
Why It Is Needed
Windows 11’s Start menu is one of its most divisive changes. Open‑Shell provides a lightweight and highly customizable replacement that closely mirrors the Windows 7 experience.
How to Set It Up
Download Open‑Shell from GitHub and install it, again using a dedicated folder for organization.
Once installed, open the Start menu to access the settings panel.
Next:
- Download the Windows7like Combo Revision E skin from the Open‑Shell forum
- Copy the skin file into the Skins folder inside the Open‑Shell installation directory
In Open‑Shell settings:
- Enable Show all settings
- Navigate to Skins and select the downloaded skin
Optional refinements:
- Under Customize Start Menu, set Control Panel to Show as link
- Under Menu Look, disable Menu glass to enable background transparency
This completes an authentic Windows 7 Start menu with proper transparency and layout.
Chapter 3 — DWMBlurGlass (Aero Transparency)
What It Does
At this point, window title bars still appear flat. DWMBlurGlass restores Aero‑style blur and transparency to window borders and title bars.
Why It Is Needed
Aero Glass is one of Windows 7’s defining visual features. Without blur and translucency, the interface still feels modern and flat.
How to Set It Up
Download DWMBlurGlass from GitHub and extract it to a permanent folder outside the user directory.
Run the executable and:
- Click Install
- Enable all available effects
- Set blur radius to 8
Next:
- Navigate to Symbols and install symbol files
- Open Advanced settings
- Select Aero look
- Enable Use accent color to override color settings
This activates full Aero‑style transparency.
Chapter 4 — Explorer Patcher (File Explorer)
What It Does
Explorer Patcher restores the Windows 7‑style File Explorer, including the classic command bar, navigation layout, and legacy context menus.
Why It Is Needed
File Explorer is used constantly. Windows 11’s modern command bar and context menus break the Windows 7 illusion.
How to Set It Up
Download Explorer Patcher from GitHub and run the installer.
If your taskbar customizations disappear:
- Right‑click the taskbar
- Open Properties
- Set taskbar style back to Windows 11
- Restart Explorer Patcher
In Explorer Patcher settings:
- Register Explorer as a shell extension
- Disable Windows 11 context menu
- Enable legacy file transfer
- Enable classic drive grouping in This PC
- Set control interface to Windows 7 Command Bar
- Enable Shrink address bar height
- Enable Apply Mica effect to navigation bar
Refresh the application to apply all changes.
Performance Impact
Despite the extensive visual changes, performance remains excellent.
On an idle system:
- CPU usage averages around 7%
- Memory usage is approximately 2.8 GB
All tools operate efficiently and do not introduce instability or excessive resource usage.
Conclusion
This setup delivers the best of both worlds:
- Windows 11’s modern core, security updates, and hardware support
- Windows 7’s iconic interface, taskbar, Start menu, Aero Glass, and File Explorer
All of this is achieved without modifying system files or using unsafe patching methods.
If you want help, updates, or troubleshooting, join the community Discord. And if you enjoyed this project, consider supporting it by liking and subscribing.
The Windows 7 experience is back — running on Windows 11.
📦 Download Center
Follow us on YouTube (@Unknown Tech) for video tutorials, tips, and full walkthroughs for every step.
Have questions or want the code/snippets used in this video? Join our Discord or check out the Downloads section below!
📺 Want to see it in action? Watch the full video on YouTube.
Don´t want to miss out on new customization tools and setups?
Subscribe to our newsletter and stay ahead in the world of Windows customization! From the latest tools to our favorite setup ideas, you’ll never miss a chance to enhance your desktop experience again!
Disclaimer for Source Code / Tutorials
The code examples and tutorials are provided for educational purposes only. Use at your own risk. I do not accept any liability for damages resulting from the use of this code.